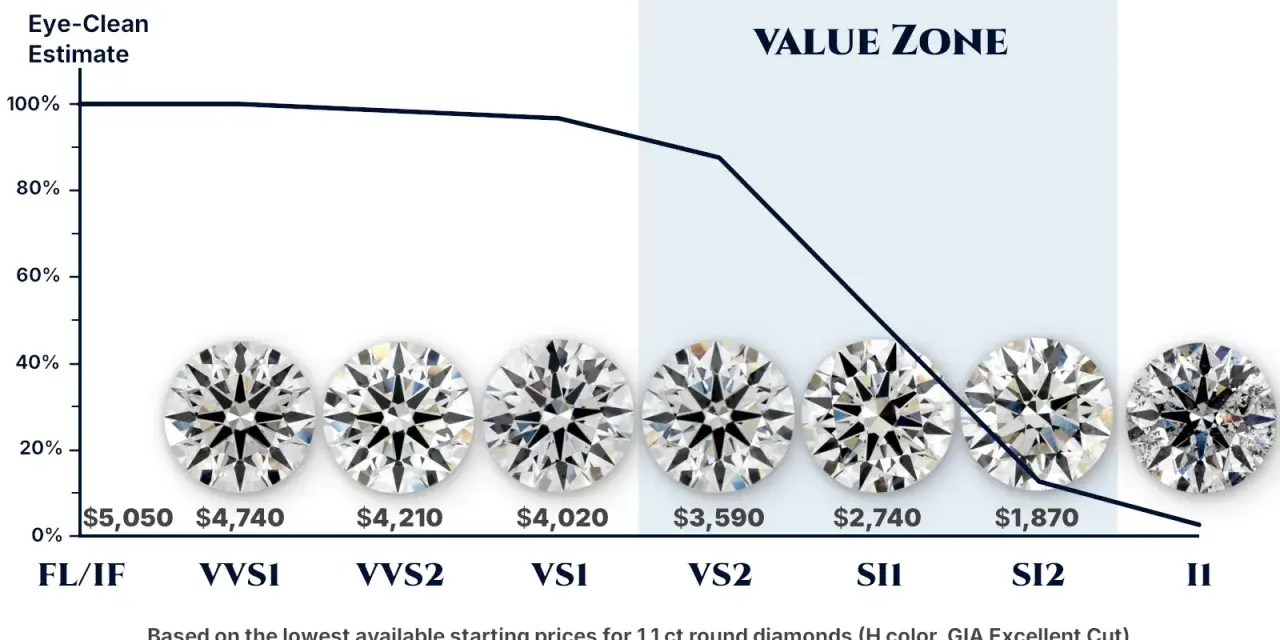
Choosing clarity is really about balancing rarity and visibility. A diamond clarity chart is useful only when you can translate each grade into what it means on the finger: how clean the stone looks, how much it costs, and how much room you have before the imperfections become distracting. This guide breaks down the scale, shows how to read a grading report, and points to the grades that usually make the most sense for everyday jewellery.
The clarity basics that matter most
- Clarity measures inclusions and blemishes, not sparkle on its own.
- GIA grades diamonds under 10x magnification and uses 11 clarity grades from Flawless to Included.
- For most buyers, the best value often sits in the VS range, with some carefully chosen SI stones offering strong value.
- Shape, cut style, and inclusion position can matter as much as the grade itself.
- Eye-clean is a buying term, not a formal grade, so it always needs to be checked in the actual diamond.
What clarity actually measures
Clarity is the assessment of internal and external characteristics, usually called inclusions and blemishes. GIA grades these features under 10x magnification and considers the size, nature, position, colour or relief, and quantity of the characteristics. That matters because a tiny crystal near the edge may be far less visible than a larger feather under the table, even if the label is the same.
When I explain clarity to buyers, I usually separate two questions: what is present and how visible it is in the finished diamond. A stone can have a few small marks and still look clean face-up, while another with the same grade may show its inclusion more easily because of where it sits or how the stone is cut. Once that is clear, the scale itself becomes much easier to read.
Once you know what the grade measures, the scale itself becomes much easier to read.
How the scale is read from flawless to included
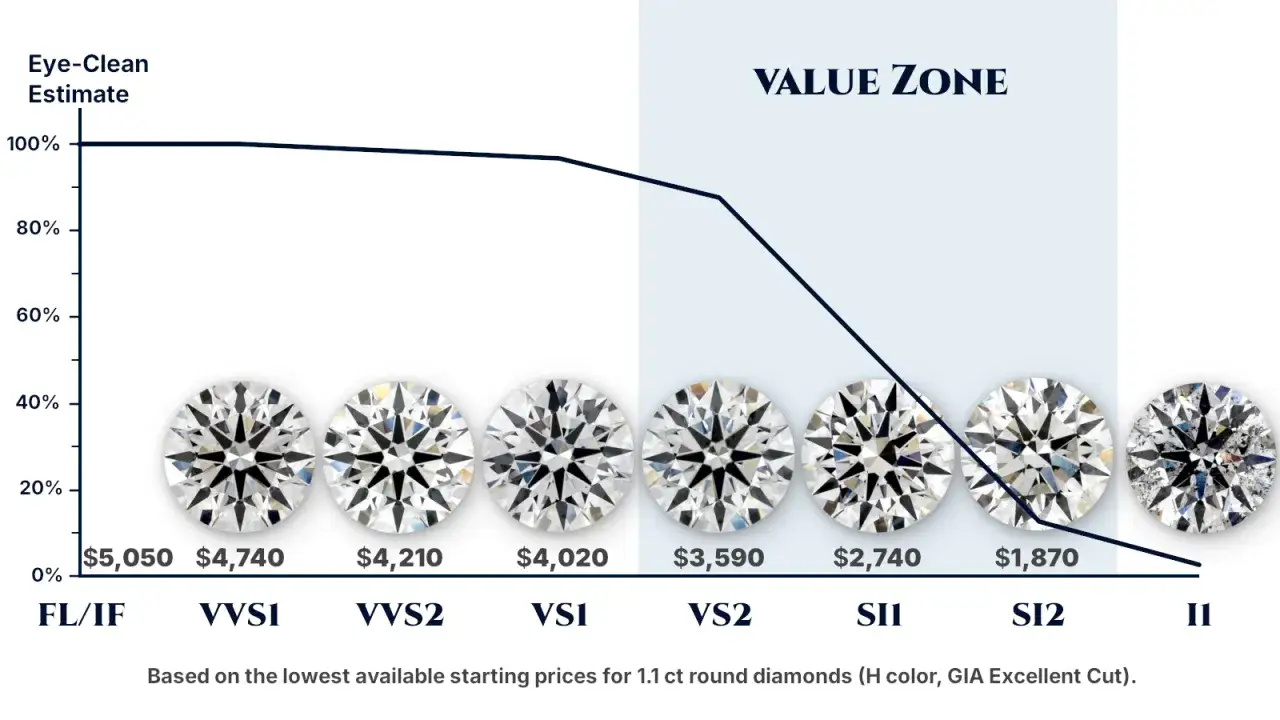
The GIA clarity scale has 11 grades, from Flawless to Included. The labels are less important than the pattern behind them: the closer you get to the top, the fewer and harder-to-see characteristics there are under magnification. According to GIA, most diamonds fall into the VS or SI range, which is where most buyers end up comparing real-world value rather than chasing perfection.
| Grade | What it means | Practical takeaway |
|---|---|---|
| FL | No inclusions or blemishes visible at 10x | Exceptionally rare and usually priced accordingly |
| IF | No inclusions, only insignificant surface blemishes | Very rare, but usually beyond what most buyers need for appearance alone |
| VVS1 | Minute inclusions that are extremely difficult to see | Near-top clarity without the premium of the rarest grades |
| VVS2 | Minute inclusions that are very difficult to see | Still very high clarity, often visually close to VVS1 |
| VS1 | Minor inclusions that are difficult to see under 10x | Often an excellent balance of beauty and price |
| VS2 | Minor inclusions that are somewhat easy to see under 10x | Frequently the sweet spot for value in well-cut stones |
| SI1 | Noticeable inclusions at 10x, sometimes eye-clean face-up | Can be a strong buy if the inclusion is well placed |
| SI2 | More noticeable inclusions, often visible without magnification | Can work in some settings, but needs close inspection |
| I1 | Obvious inclusions, usually easy to spot | Appearance and durability both need careful checking |
| I2 | Very obvious inclusions | Usually not ideal for fine jewellery unless budget is the main driver |
| I3 | Severe inclusions that are obvious at a glance | Can affect beauty and durability significantly |
The practical lesson is simple: the grade tells you the neighbourhood, not the full story. The next step is to look at where the inclusion sits, because that often matters more than the letter on the report.
Why the same grade can look different in real life
Clarity grades are not visual twins. Two VS2 diamonds can behave very differently depending on where the inclusion sits, what kind it is, and how the stone is cut. A tiny crystal near the pavilion can disappear in a setting, while a feather under the centre may catch the eye every time the light moves.
| Factor | Why it matters | What I look for |
|---|---|---|
| Location | Inclusions under the table are more noticeable than those near the edge | Off-centre or near the girdle is often easier to live with |
| Type of inclusion | Crystals, feathers, clouds, and needles behave differently | Structural inclusions deserve more caution than harmless pinpoints |
| Cut style | Brilliant cuts hide more; step cuts reveal more | Emerald and Asscher cuts usually need stricter clarity judgement |
| Carat weight and face-up size | Larger stones give the eye more room to find flaws | Be more selective as the centre stone gets larger |
| Setting | Prongs, halos, and bezels can hide or expose areas | Check the diamond in the style you actually plan to wear |
This is why an emerald cut often needs a cleaner grade than a round brilliant of the same size. The long, open facets do less hiding, so clarity matters more visually. If you are choosing between shapes, clarity should always be judged alongside the cut style, not in isolation.
That difference becomes especially important when you start deciding how much clarity you actually need to pay for.
Which grades usually give the best value
If the goal is a beautiful ring rather than a laboratory-perfect stone, I usually start with VS2 and move down carefully into SI1. That range often gives the best mix of appearance and price, especially when the diamond is well cut and the inclusion is not centred under the table. In many round brilliant, oval, cushion, and princess stones, a good SI1 can look just as convincing face-up as a more expensive VS stone.
- Best low-risk choice VS1 or VS2, especially if you want a straightforward buying decision.
- Best value target SI1, provided the stone is eye-clean in the setting you want.
- Be more cautious with SI2, because some stones are attractive and others show too much to ignore.
- Usually overkill for appearance alone VVS and above, unless rarity is part of the brief.
I would not dismiss higher grades entirely, because they matter if you are buying for rarity, investment appeal, or a very minimal aesthetic. But for most practical purchases, clarity stops being the main story once the stone is clean enough to look elegant in normal wear. That is where mistakes start to creep in, especially when buyers compare only the grade and miss the actual stone.
Before you commit, it helps to know the traps that most often lead people to overpay.
The mistakes that cost buyers money
The biggest error is paying for a grade that no one will ever notice once the diamond is set. FL and IF are impressive on paper, but the visual jump from a strong VS stone to flawless is often tiny in real life. I would rather see that money improve cut quality or go into a better setting if the diamond already looks clean.
- Confusing clarity with sparkle A diamond can have excellent clarity and still look dull if the cut is weak.
- Assuming all SI stones are the same One SI1 may be a bargain, another may have a distracting inclusion right in the centre.
- Ignoring the plot diagram The map shows where the inclusions sit, which is often more useful than the grade alone.
- Buying from a still photo only Videos and face-up views reveal a lot more than a polished marketing image.
- Forgetting the shape Step cuts usually demand stricter clarity judgement than brilliant cuts.
If you avoid those five mistakes, you are already ahead of most first-time buyers. The next step is checking the report properly, because that is where the details behind the grade become visible.
What to check on the grading report before you buy
A grading report is the part of the process I trust most, because it shows how the lab reached the clarity grade. Look for the clarity plot, the stated grade, and whether the stone has any comments that hint at durability concerns or unusual internal features. GIA reports, for example, include a plotted diagram of clarity characteristics, which helps you see whether the inclusion is centrally placed or tucked away at the edge.
- Match the grade to the plot A clean-looking label should make sense when you inspect the diagram.
- Check for structural features Feathers and cleavages need more attention than harmless crystals.
- Read the stone face-up A report tells you a lot, but it does not replace seeing the diamond in real lighting.
- Ask about the setting A prong or bezel can hide a flaw, but it can also leave it exposed.
- Use the video, not just the grade For online buying, a clear video is the closest thing to handling the stone yourself.
When a seller only repeats the grade and skips the plot, I become more cautious. The report should help you understand the diamond, not hide the parts that matter.
With the report in hand, the last step is deciding what clarity level makes sense for the exact style of diamond you want.
The clarity choices I would make for common ring styles
For a round brilliant or oval, I usually aim for a clean-looking VS2 first and then consider SI1 if the plot and video look reassuring. For an emerald or Asscher cut, I would be more conservative and often move up a grade, because the open facet pattern leaves less room for concealment. For a smaller centre stone or a setting with strong visual presence, such as a halo, I can be comfortable choosing a slightly lower clarity if it still reads as eye-clean at normal viewing distance.
The rule I use is simple: buy the diamond that looks right in the real setting, not the one that merely wins on paper. Once clarity is clean enough to disappear in everyday wear, the better decision usually comes from balancing shape, cut, and budget rather than stretching for the highest label. That is the practical way to use the scale without overpaying for detail you will never notice.