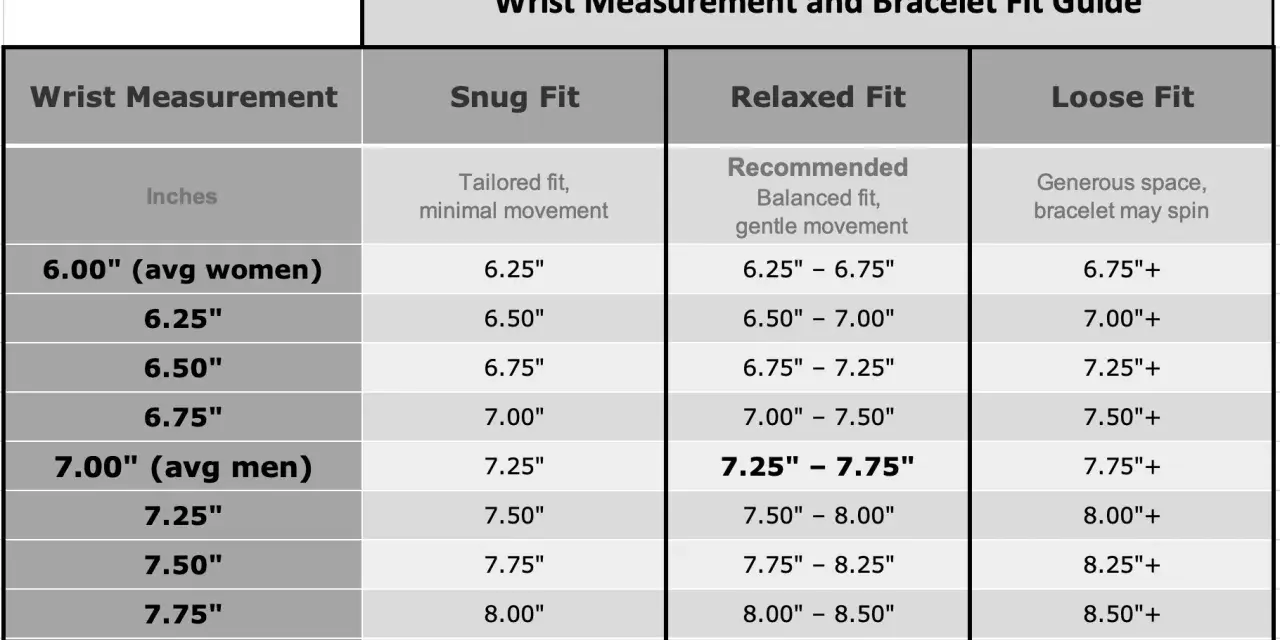
Choosing a bracelet that sits well is mostly a question of proportion. I usually treat it as a two-step job: measure the wrist first, then add the right amount of ease for the style you want. In this guide, I’ll show you how to read a bracelet size chart, measure at home, and choose the right length for chains, cuffs, bangles, and beaded styles, with UK shopping in mind.
The quickest way to choose a wearable bracelet length
- Measure the wrist where the bracelet will sit, not over clothing and not too tightly.
- Add about 0.5 to 1 cm for a close fit, 1.5 to 2 cm for everyday wear, and 2.5 to 3 cm for a looser drape.
- Flexible bracelets and rigid pieces do not size the same way, so the style matters as much as the number.
- If you are between sizes, I usually lean toward the larger size for comfort unless the design is meant to sit very close.
- Keep centimetres and inches together when comparing UK and international listings.
How I read a bracelet size chart without mixing up wrist size and bracelet length
The number you measure on your wrist is the starting point, not the finished bracelet length. For flexible bracelets, I look at how much extra room the design needs to move comfortably, because a bracelet that matches the wrist exactly usually feels too tight. In the UK, listings often show both centimetres and inches, so I keep both units visible when I compare options.
| Fit goal | Add to wrist size | Best for |
|---|---|---|
| Snug | 0.5 to 1 cm | Neat chain bracelets, minimal movement |
| Classic | 1.5 to 2 cm | Everyday chains and link bracelets |
| Relaxed | 2.5 to 3 cm | Loose drape, charms, bolder styling |
If your wrist measures 16 cm and you want a classic everyday fit, I would start around 17.5 to 18 cm. That gives a little movement without letting the bracelet spin around all day. And if you think in inches, 1 inch equals 2.54 cm, so a 7-inch bracelet is just under 17.8 cm. Once that logic is clear, the measurement itself becomes much easier to trust.
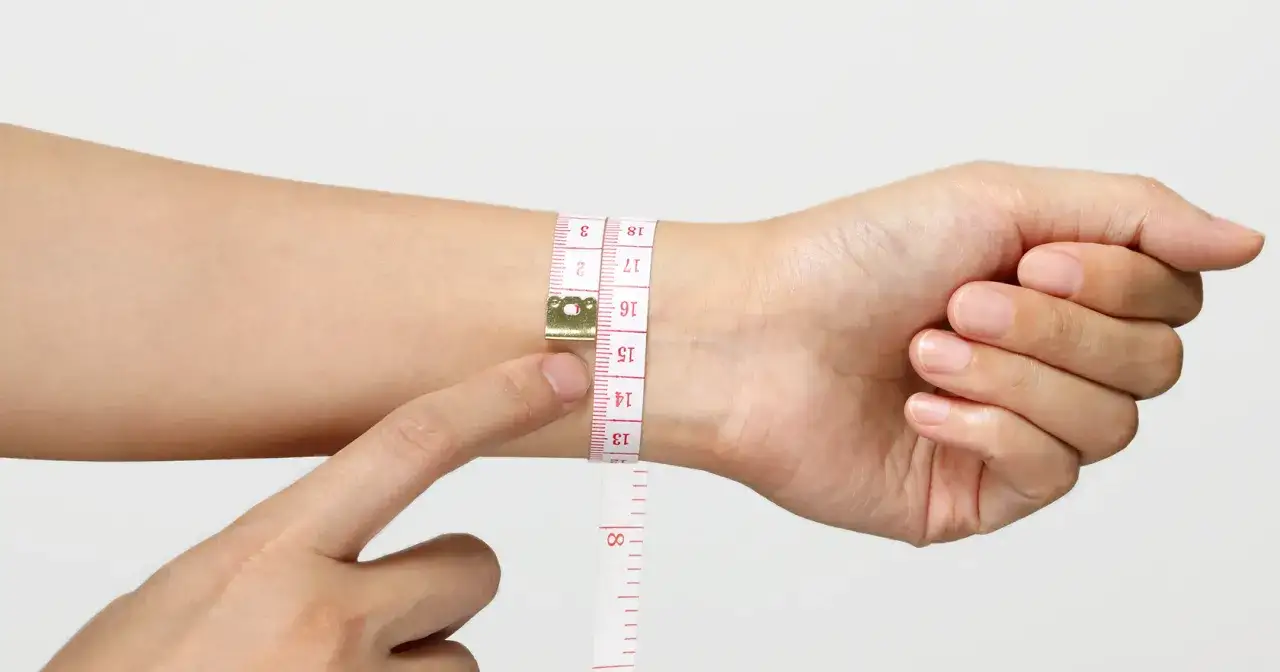
Measure your wrist accurately at home
I prefer a soft measuring tape, but a strip of paper, ribbon, or string works just as well. The important part is where and how you measure. Measure on the spot where the bracelet will rest, usually just above the wrist bone, and keep your hand relaxed while you do it.
- Wrap the tape or string around the wrist where the bracelet will sit.
- Keep it snug, but do not squeeze the skin.
- Mark the point where the ends meet.
- Lay the strip flat and measure it in centimetres, then check the inches if you need them.
- Repeat once, because a second reading often catches small errors.
If your hands swell a little during the day, measure in the evening rather than first thing in the morning. That gives you a more realistic wearing size. With that number in hand, the next step is deciding how the bracelet style should change the fit.
Different bracelet styles need different allowances
This is where sizing becomes more than simple math. A chain bracelet, a cuff, and a bangle can all share the same wrist measurement and still need different finished lengths. I always size them according to how they sit on the body, not just the number on the tape.
Chain and link bracelets
These are the easiest to size, because they move with the wrist. I usually add 1.5 to 2 cm for an everyday fit, and a little more if the bracelet is wide, heavy, or decorated with charms. Wider links and larger clasps can make the bracelet feel shorter than the label suggests, so I do not ignore the hardware.
Cuffs and bangles
Cuffs and bangles are much less forgiving. A cuff should slide on without pinching, then sit securely without turning into a spinning loop of metal. A rigid bangle is even stricter, because the hand has to pass through the opening, which means the widest part of the hand matters more than the wrist alone. If the piece has no hinge, wrist measurement by itself is not enough.
Read Also: Necklace Length Guide - Find Your Perfect Fit & Style
Beaded and elastic bracelets
Elastic designs can look flexible, but forcing them to stretch is a bad habit. If the bracelet feels tight when you put it on, it will also feel tight after a few hours, and the elastic will age faster. For beaded styles, I want enough room for the bracelet to settle naturally without leaving a large gap.
Once you know how the style affects fit, the next obstacle is brand language, which is where a lot of people get tripped up.
Why UK bracelet labels can look inconsistent
One retailer may give you a plain centimetre length, another may use small, medium, and large, and a third may describe the same piece by wrist size rather than bracelet length. That does not always mean the sizing is wrong. It usually means the brand is describing a different measurement point.
- Wrist circumference is the measurement around your wrist.
- Bracelet length is the finished wearable length of the bracelet itself.
- Inner circumference matters for rigid bangles and cuffs, because the opening and shape affect how the piece goes on.
- Wearable length can change if the clasp is bulky or the bracelet includes charms.
That is why I always check the product page for the actual centimetre measurement, not just the size label. A size called medium on one site may feel more like a small on another. If the listing does not say what the measurement refers to, I treat it cautiously and look for a fuller size note before I buy.
The most common sizing mistakes I still see
Most bad bracelet fits come from a few repeat errors, and none of them are mysterious. They usually happen when the buyer assumes the bracelet will behave like another piece they already own.
- Measuring too tightly and then wondering why the bracelet feels restrictive.
- Treating a bangle like a chain bracelet, which can leave you with something that will not pass the hand.
- Ignoring charms, heavy links, or thick clasps that reduce the wearable length.
- Using ring size or clothing size as a shortcut, which is rarely reliable.
- Forgetting that stacked bracelets need a little more room if you want them to sit neatly instead of crowding each other.
The worst mistake is probably the simplest one: assuming the wrist measurement and the bracelet length are the same thing. They are not. Once that is clear, most sizing errors become easy to avoid.
When I size up, size down, or ask for an adjustment
If I am between sizes, I usually size up for chain, link, and charm bracelets. That keeps the piece comfortable and gives the clasp a little breathing room. I only size down when I want a deliberately close fit, or when I am building a clean stack and do not want too much movement between bracelets.
- Size up for flexible bracelets if you want comfort, drape, or extra movement.
- Size down only when the design is meant to sit close and you know you prefer that look.
- Ask about adjustment for cuffs if the metal can be safely resized, but do not rely on repeated bending.
- Check the return window before buying rigid styles, because they are harder to correct after the fact.
For gifts, I prefer the more forgiving fit unless I know the wearer likes a tighter look. A slightly generous bracelet is usually easier to wear than one that feels perfect on paper but uncomfortable in real life.
The small details I check before I buy
Before I commit to a size, I check three things: the bracelet’s construction, the clasp placement, and whether any charms, stones, or rigid links reduce the useful length. Those details can change how a bracelet wears more than the label suggests.
- Save your wrist measurement in centimetres and inches so you can reuse it later.
- If you stack bracelets, measure the spot where the stack will sit, not just the narrowest part of the wrist.
- If you already own a bracelet that fits well, measure that one too, because it becomes your best comparison point.
That is the approach I trust most: measure once, match the style honestly, and let the bracelet move the way the design intended. Do that, and sizing stops being a guessing game.